How to Draw Stitch – Step-by-Step Beginner Guide
Stitch, the mischievous blue alien from Disney’s Lilo & Stitch, has captured the hearts of millions since his debut in 2002. His expressive face, distinctive ears, and playful personality make him a favorite subject for artists of all skill levels. Whether you’re a complete beginner or looking to refine your character drawing abilities, learning how to draw Stitch provides an excellent foundation in cartoon illustration.
This guide breaks down the drawing process into manageable steps, covering everything from basic shapes to coloring techniques. By understanding the character’s key features and following a structured approach, anyone can create a recognizable Stitch illustration.
The tutorial covers both traditional pencil sketching and digital methods using popular apps like Procreate, ensuring flexibility regardless of your preferred medium.
How Do You Draw Stitch Step by Step?
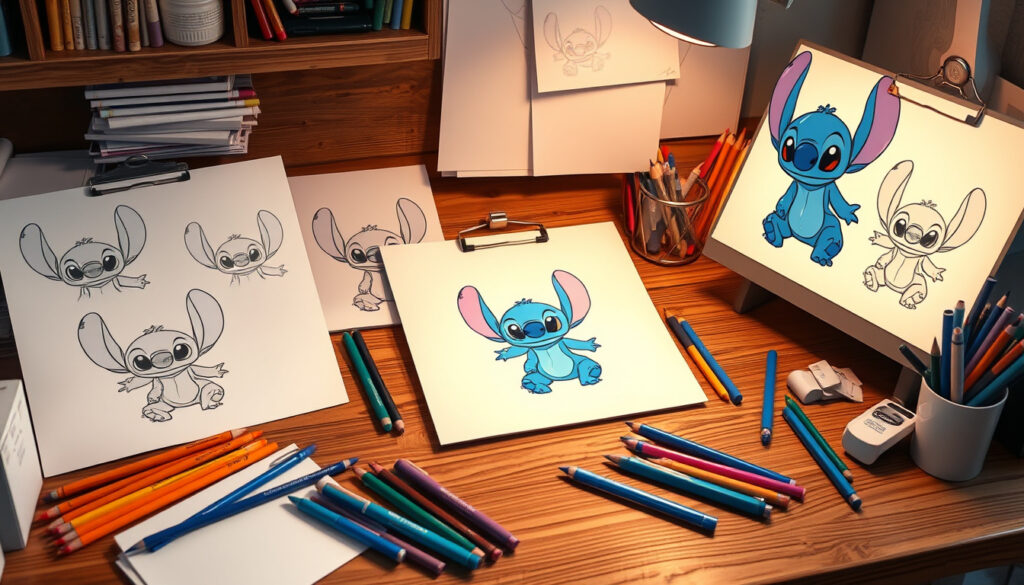
The foundation of any successful Stitch drawing lies in mastering four essential stages. Each phase builds upon the previous one, creating a solid framework for the final illustration.
Create the upside-down U shape with rounded corners
Add eyes, nose, mouth, and eyebrows
Draw torso, arms with claws, and legs
Apply blue tones with highlights and shadows
Gather Your Materials
Before beginning, collect basic supplies. For traditional drawing, you’ll need a pencil for light sketching, an eraser for corrections, drawing paper, and coloring tools such as colored pencils, markers, or crayons. Starting with light pencil strokes ensures you can easily erase and adjust guide lines as you work through each stage.
For digital drawing in Procreate, begin with a new canvas and use a pencil brush for the initial sketch. Switch to inking and coloring brushes for the finishing touches. The core steps remain consistent whether you work traditionally or digitally.
Outline the Basic Shape
Start by drawing a large upside-down U or rounded teardrop in the center of your paper for Stitch’s head. Make it wide at the top and narrower at the bottom. This shape forms the foundation for the entire character. Below the head, draw two curved lines extending downward for the body sides, then create a raindrop shape for the torso with the curved belly wider at the bottom.
Add curved arms extending from the shoulders with three claw fingers represented by curved V shapes. For the legs, draw stubby limbs ending in clawed feet. Complete this stage with zigzag lines across the chest to suggest fur texture, then outline everything cleanly.
Add Facial Features
Position two large round eyes high on the head, placing them on either side of the nose area. Add smaller circles inside for the pupils and shade the smallest area to create a shine effect. Draw thick, curved eyebrows connecting to the outer edges of the head shape.
In the center of the face, create a U-shaped nose resembling a pointed V with a curve at the top, including small nostrils. Below the nose, add a curved mouth line that droops down then curves upward beneath the eyes. From each cheek, draw a large outward curve and top it with an upside-down U for the distinctive floppy, notched ears.
- Use light pencil strokes throughout the sketching phase for easy corrections
- Keep the head proportionally large, approximately half the page for chibi style
- Make one ear slightly larger or notched for the authentic Disney asymmetry
- Position eyes high on the head for maximum expressiveness
- Add cheek lines or fur patches for character detail
- Pause between steps to assess proportions before continuing
- Reference movie stills for accuracy on ear notches and antenna stub
| Feature | Tip | Common Error |
|---|---|---|
| Head | Keep it oversized, roughly 60% of body height | Drawing it too small |
| Eyes | Large and expressive with shine dots | Making them too small or too close together |
| Ears | Notched and floppy, one slightly larger | Making them symmetrical |
| Body | Raindrop torso with wide curved belly | Making the body too thin or elongated |
| Claws | Three curved V shapes on hands and feet | Forgetting the claws or making them too sharp |
| Fur | Zigzag chest lines, cheek patches | Overcomplicating with too many fur lines |
How to Draw Stitch’s Face and Key Features
The face carries the character’s emotional range and recognizability. Mastering facial proportions and details separates a generic blue creature from an unmistakable Stitch. Understanding how each feature contributes to his distinctive look helps artists make intentional choices during the drawing process.
Drawing the Eyes and Nose
Stitch’s eyes are his most expressive feature. They sit high on his head and dominate the upper face. The tutorial at Easy Drawing Tutorials emphasizes starting with large circular shapes before adding internal details. Place the eyes symmetrically on either side of the center line, leaving adequate space between them.
Inside each eye, add concentric circles for the iris and pupil. Shade the smallest inner circle darkest to create the signature shine that gives Stitch his mischievous look. The nose presents a unique challenge, combining a U-shape with a pointed top in a configuration that resembles a stylized anchor.
Before finalizing the face, step back and compare your drawing to reference images. The eyes should occupy roughly one-third of the head width, and the nose should sit equidistant between the eyes and mouth line.
Shaping the Ears and Antenna
Stitch’s ears extend outward from his cheeks in a distinctive floppy curve topped with an inverted U shape. The notched design adds character and distinguishes him from other cartoon aliens. According to drawing tutorials, making one ear slightly larger than the other creates the authentic Disney asymmetry that artists should preserve.
Above the head sits a small antenna stub, often overlooked but essential for accurate representation. While not always visible in certain poses, including it adds authenticity to full-body drawings. Reference official character images to understand how the antenna responds to different head positions.
How to Color and Detail Your Stitch Drawing
Color brings Stitch to life and transforms a line drawing into a vibrant character illustration. Understanding his official color palette ensures your artwork remains recognizable while proper shading techniques add dimension and professionalism to the final piece.
Base Colors
Stitch’s color scheme follows a consistent palette across the franchise. The body uses a medium blue identified as approximately #4A90E2 in hex code. Ears and darker patches utilize a deeper blue around #2E5A9E. The eyes, nose, and mouth appear in solid black, while teeth and tongue render in white. Inner ears and the inside of the mouth feature pink tones.
Consistency with these colors matters for recognizability. Even stylized or chibi interpretations benefit from maintaining this core palette.
Shading and Highlights
Shading transforms a flat drawing into a dimensional character. Apply lighter blue highlights on curved surfaces including the top of the head and the belly area. Darker blue shadows work best beneath the chin, along the arms, and behind the ears.
For traditional media, build up color layers gradually using colored pencils and vary pencil pressure to achieve smooth gradients. Digital artists working in Procreate can clip color layers to line art and use soft brushes for shading. The Gaussian blur tool helps create realistic fur texture.
Never skip adding highlights and shadows. Flat coloring makes drawings appear two-dimensional and less polished. Always include white shine dots in the eyes for that characteristic sparkle.
Stitch’s blue (#4A90E2) should be lighter than his ear and patch blue (#2E5A9E). Using the same shade for all blue areas flattens the character and reduces visual depth.
Expression Variations
Stitch communicates through exaggerated facial expressions that artists can modify to convey different emotions. The happy expression features a wide grin with raised eyebrows. For sadness, draw a downturned mouth with droopy ears angled downward. Angry Stitch requires furrowed brows and visible sharp teeth.
When drawing for children, exaggerate the eyes and ears to enhance cuteness. Tutorial resources suggest starting with a neutral expression and adjusting features incrementally to achieve the desired emotional effect.
What Materials Do You Need to Draw Stitch?
Selecting appropriate materials impacts both the drawing process and final result. Different tools suit different skill levels and artistic goals, making it worth understanding your options before starting.
Traditional Tools
Beginners benefit from starting with basic supplies readily available at any craft store. A quality sketching pencil (HB or 2B) provides good visibility while remaining erasable. Drawing paper with slight tooth helps colored pencils layer effectively. An eraser that removes pencil marks cleanly prevents smudging and ghost lines.
Colored pencils offer the most control for beginners adding color, allowing gradual buildup of tones and easy corrections. Markers provide bold, vibrant coverage but limit blending options. Crayons work for young artists but may appear less refined in finished pieces.
Digital Alternatives
Digital drawing offers advantages including unlimited undo options, easy color correction, and no supply costs over time. Procreate stands as a popular choice for tablet artists, providing specialized brushes designed for character illustration. The drawing tutorial series demonstrates how to set up a new canvas and use pencil brushes for sketching before switching to inking and coloring tools.
Essential digital supplies include a drawing tablet or iPad, stylus, and software with layers capability. The initial investment exceeds traditional supplies but pays off through durability and versatility.
Pressing too hard during early sketching creates lines difficult to erase cleanly. Pressing too softly makes subsequent lines invisible. Practice maintaining consistent, light pressure throughout the sketching phase for best results.
The Drawing Process: From Sketch to Finish
Understanding the complete workflow helps artists plan their time and ensure no steps get skipped. Each stage serves a specific purpose in the overall creation process.
- Initial Sketch: Light pencil lines establish basic shapes and proportions
- Detail Refinement: Add facial features, ears, and body details
- Line Cleanup: Erase guide lines and darken final contours
- Base Coloring: Apply primary colors following the official palette
- Shading and Depth: Layer highlights and shadows for dimension
- Final Touches: Add shine dots, fur texture, and expression details
For those learning through video resources, pausing at each stage allows adequate time to replicate the lines accurately. The curated tutorial playlist provides additional practice opportunities for various skill levels.
Canon Design vs. Creative Variations
Disney’s official character model sheets contain precise proportions, expressions, and poses used by professional animators. However, these documents remain primarily internal references and are not publicly available. Available tutorials approximate the canon design based on observations from the films and promotional materials.
| Established Information | Information Requiring Further Verification |
|---|---|
| Blue fur color scheme | Official hex color codes (tutorials provide estimates) |
| Four-armed capability in some poses | Precise model sheet proportions |
| Notched, floppy ears with asymmetry | Exact antenna positioning in all poses |
| Oversized head to body ratio | Official shade and highlight placement |
| Mischievous eye design with shine | Precise fur patch locations |
Background: Why Stitch Endures as a Drawing Subject
Stitch debuted in Disney’s 2002 animated feature Lilo & Stitch, introducing audiences to Experiment 626, a genetically engineered alien with a mischievous streak and hidden capacity for love. The character was designed to be visually distinctive, combining rounded shapes that evoke cuteness with sharp features like claws and teeth that suggest danger.
His design emphasizes approachability through large eyes and a compact body while maintaining visual interest through asymmetry, fur texture, and expressive potential. These characteristics make him forgiving for beginners while offering enough complexity for advanced artists to refine their skills.
The character’s universal appeal spans age groups and artistic abilities, contributing to his continued popularity as a subject for tutorials, fan art, and children’s activities. Drawing Stitch provides opportunities to practice fundamental skills applicable to character illustration generally.
Tutorial Sources and Credibility
Artistic tutorials on character drawing come from various sources, each offering distinct advantages. Video tutorials provide visual demonstrations that show techniques in real time, while written guides offer opportunities to work at individual pace and reference specific steps repeatedly.
When drawing Stitch, remember that the oversized head and ears (roughly 60% of body height) and the distinctive notched ear asymmetry are key to capturing his likeness accurately.
— Drawing tutorial analysis based on multiple video sources
Resources from established drawing tutorial websites and experienced YouTube creators provide tested methodologies refined through audience feedback. The Easy Drawing Tutorials database offers structured approaches validated by community use.
For professional reference, ArtStation portfolios showcase fan art demonstrating how experienced artists interpret character designs. These examples show the range of possible styles while respecting core design elements that define Stitch’s appearance.
Summary
Drawing Stitch becomes manageable when broken into four core stages: head outline, facial features, body construction, and coloring. Understanding his distinctive features, including the oversized head, notched asymmetric ears, and mischievous eyes, enables artists to create recognizable interpretations regardless of skill level.
Whether using traditional pencils or digital tools like Procreate, the fundamental approach remains consistent. Light sketching, careful proportion checking, and methodical layering produce professional results. Practice builds confidence, and multiple attempts improve understanding of what makes Stitch visually distinctive.
For those seeking structured guidance, related tutorials on How to Draw Stitch – Easy Step-by-Step Chibi Guide and How to Draw Stitch – Step-by-Step Guide for Beginners offer additional practice opportunities at varying difficulty levels.
Frequently Asked Questions
What are common mistakes when drawing Stitch?
Pressing too hard during early sketching makes guide lines difficult to erase. Uneven ears should intentionally differ in size for authentic asymmetry. Flat shading without highlights or shadows creates a two-dimensional appearance. Keeping the head too small relative to the body undermines the chibi proportions that define Stitch’s look.
Should I use digital or traditional tools for drawing Stitch?
Traditional pencils, erasers, paper, and colored pencils work well for beginners and offer tactile feedback. Digital tools like Procreate provide unlimited corrections and versatile layering. Both approaches yield professional results when practiced consistently.
How can children successfully draw Stitch?
Children should exaggerate the eyes and ears for maximum cuteness. Using light pencil strokes allows easy corrections. Starting with the large head shape keeps proportions manageable. Parents can pause video tutorials between steps to ensure children follow along comfortably.
How do I draw different Stitch expressions?
Happy expressions feature wide grins and raised brows. Sad expressions use downturned mouths and droopy ears. Angry expressions require furrowed brows and visible teeth. Adjust eyebrow angle and mouth curve to convey each emotion effectively.
What colors does Stitch use?
Stitch’s body is medium blue (#4A90E2) with darker blue (#2E5A9E) for ears and patches. Eyes, nose, and mouth appear in black. Teeth are white while inner ears and mouth interior are pink.
How do I add shading to my Stitch drawing?
Apply lighter blue on curved surfaces like the head top and belly. Use darker blue beneath the chin, arms, and behind ears. Traditional artists vary pencil pressure to create gradients while digital artists use soft brushes and layer blending.
Where can I find official Disney reference materials?
Disney’s official model sheets remain primarily internal documents not publicly available. Movie stills, promotional images, and Blu-ray frame captures provide reliable reference alternatives for studying official design proportions and details.
More related posts
 Jeff Baena – Life, Career, and Tragic Death
 What is Low Blood Pressure – Causes, Symptoms, and Treatment
 English Football League Tables in Order – Latest BBC & EFL Standings
 Terry-Thomas – Cause of Death, Movies, and Financial Decline
 Liz White – Biography, Movies, TV Shows and Age (2025)
 Danny Sebastian – Biography, TV Career, and Personal Life
 Chelsea Peretti – Biography, Husband, Net Worth and Career
 William Conqueror – The Norman King’s Biography and Legacy